Not everyone realizes it, but you can actually customize the context menu that appears when you right click a flash application in ActionScript 3. You can add new items and you can even remove some of the existing items. But lets get one thing out of the way first:
Can I remove or hide the Flash context menu?
The answer is no, you cannot. There is no way to hide the context menu, and although you can remove some items like the print option, there is no way to hide the “Settings…” or “About Adobe Flash Player” items. But lets go over what you can do.
1. Creating a custom context menu
Setting up a custom context menu in ActionScript 3 is extremely easy:
|
1 2 3 4 |
var customMenu:ContextMenu = new ContextMenu(); // Set the context menu for the entire application stage.contextMenu = customMenu; |
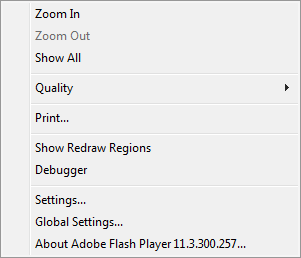
All we are doing here is creating a new instance of the ContextMenu class and assigning it to the stage‘s contextMenu property. And that is it! This will give you a custom context menu that will override the default context menu for the entire Flash application. Although because we did not modify it at all, this new menu will look identical to the default one as seen below:

2. Adding custom items to the context menu
Now here is where things get interesting; adding our own custom items to the context menu. Take a look at the following code snippet:
|
1 2 3 4 5 6 7 8 9 10 |
var customMenu:ContextMenu = new ContextMenu(); var customItem:ContextMenuItem = new ContextMenuItem('Custom Item'); // Add the custom item to the menu customMenu.customItems.push(customItem); // Listen for the custom item to be selected customItem.addEventListener(ContextMenuEvent.MENU_ITEM_SELECT, onCustomItemClicked); stage.contextMenu = customMenu; |
This should all be pretty straight forward. First we create the custom ContextMenu instance, and then we create an ContextMenuItem for it called “customItem”, specifying the text for it as the first constructor argument. Next, we add it to the ContextMenu’s customItems property. Any items you add to this array will appear at the top of the context menu. Lastly, we add a ContextMenuEvent listener so that we can find out when our custom item has been clicked. Unfortunately there is no way to add one listener to the ContextMenu for all items, so you will have to add a listener for each custom ContextMenuItem that you add. Here is an example event handler method to go with the above code snippet:
|
1 2 3 4 5 6 7 8 9 |
/** * Menu item select event handler for the custom context menu item. * * @param event The event arguments. */ private function onCustomItemClicked(event:ContextMenuEvent):void { // TODO: Add your functionality here } |
The ContextMenuEvent instance includes several useful properties including contextMenuOwner which is a reference to the ContextMenu that the clicked item is a child of, and mouseTarget which is a reference to the object in the display list which was right clicked to display the context menu.
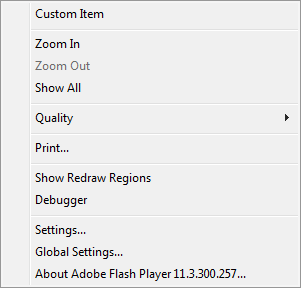
With the new custom item, our context menu now looks like this:

3. Removing existing items from the context menu
Now what about all the items that are already in the default context menu? It would be nice to get rid of some of the unnecessary ones to clean it up a bit. Many flash applications really don’t need zoom or print functionality, and sometimes we don’t want to give the user the opportunity to change the stage quality. We can remove all the optional menu items in one easy go like this:
|
1 2 3 4 5 6 |
var customMenu:ContextMenu = new ContextMenu(); // Hide all optional menu items customMenu.hideBuiltInItems(); stage.contextMenu = customMenu; |
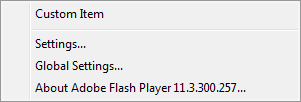
By simply calling the hideBuiltInItems() method, we can get a much cleaner context menu:
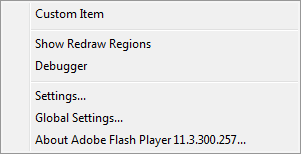
And if you are using the regular flash player instead of the debug player, you will see an even shorter menu because the “Show Redraw Regions” and “Debugger” items are only included with the debug player:
If you want to pick and choose which items to hide, you can do that too:
|
1 2 3 4 5 6 7 8 9 10 11 12 13 |
var customMenu:ContextMenu = new ContextMenu(); // Hide all optional menu items except for print and quality customMenu.builtInItems.forwardAndBack = false; customMenu.builtInItems.loop = false; customMenu.builtInItems.play = false; customMenu.builtInItems.print = true; customMenu.builtInItems.quality = true; customMenu.builtInItems.rewind = false; customMenu.builtInItems.save = false; customMenu.builtInItems.zoom = false; stage.contextMenu = customMenu; |
Here we use the builtInItems property to hide all of the built-in items except for the “print” and “quality” items.
4. Context-sensitive context menus
By very definition, context menus are meant to be context-sensitive. But despite that fact, this is a topic I do not see covered very often when talking about context menus in ActionScript 3. Making context-sensitive context menus is actually incredibly easy. Take a look at the code below:
|
1 2 3 4 5 6 7 8 9 10 |
var customMenuA:ContextMenu = new ContextMenu(); var customMenuB:ContextMenu = new ContextMenu(); // Add a custom item to each context menu so we can tell them apart customMenuA.customItems.push(new ContextMenuItem('Custom Menu A')); customMenuB.customItems.push(new ContextMenuItem('Custom Menu B')); // Set different context menus for two different objects on the stage objectA.contextMenu = customMenuA; objectB.contextMenu = customMenuB; |
So instead of setting the contextMenu property directly on the stage, we are instead creating two different ContextMenu instances and applying them to two objects, objectA and objectB, which are already on the stage. If you right click on objectA, you should see contextMenuA appear, and if you right click on objectB, you should see contextMenuB appear. Extremely simple, and extremely powerful!
So there you have it. Context menus are incredibly easy to manipulate in ActionScript 3, although there are some limitations that you have to be aware of. If you have any further questions, please feel free to leave a comment below and I will try my best to answer it.

